Premium 7 Pin Jumper Cables: Master Your Electronic Projects
What Exactly Are 7 Pin jumper Cables, and Why Are They So Crucial?
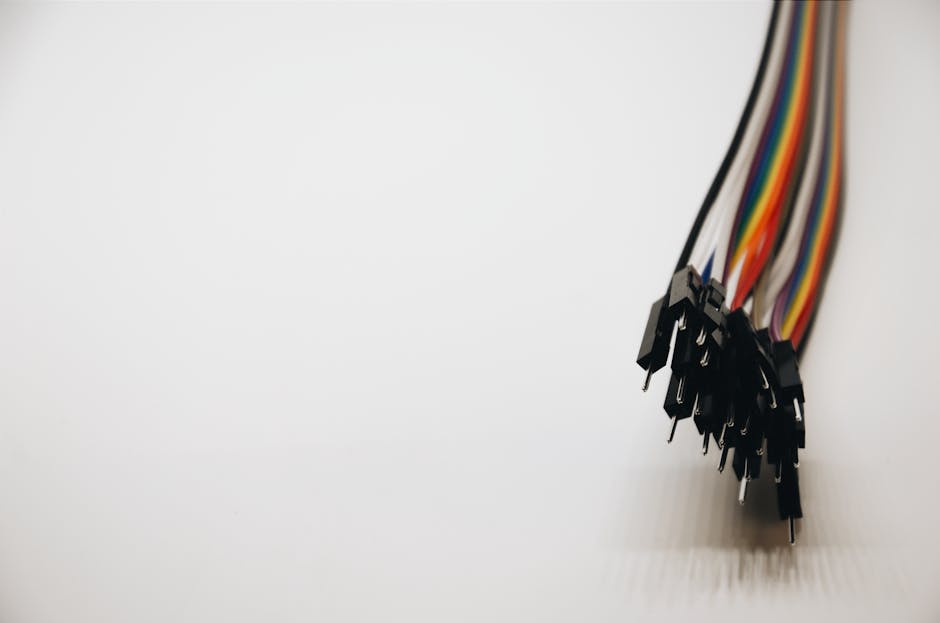
7 pin jumper cables are essentially a set of seven individual wires, often color-coded, bundled together into a single, convenient ribbon, designed for making temporary electrical connections between components. Think of them as the flexible, friendly connectors that bridge the gap between your microcontroller (like an Arduino or Raspberry Pi) and various sensors, displays, or other modules on a breadboard or custom PCB. Each wire within the ribbon has a specific pin termination – typically male, female, or a combination – allowing them to plug directly into standard header pins or sockets.
Their crucial role lies in their ability to simplify and speed up the prototyping process. Instead of cutting, stripping, and connecting seven separate wires, you handle just one organized ribbon. This not only saves time but also significantly reduces the chance of wiring errors, making debugging a much less painful experience. These versatile cables are the backbone of many test setups, allowing quick changes and reliable data transfer or power distribution in low-current applications.
Why Should I Choose 7 Pin jumper Cables Over Individual Wires?
The primary reason to opt for 7 pin jumper cables is unparalleled convenience, organization, and a substantial reduction in setup time compared to using individual wires. Imagine trying to connect a 7-segment display or a common I2C sensor that requires multiple data and power lines. With individual wires, you&d have seven distinct strands to manage, each potentially getting tangled or misidentified. The bundled nature of 7 pin jumper cables means you only deal with one unit, keeping your workspace tidier and your connections visually clearer.
- Reduced Clutter: A single ribbon takes up less space and looks far neater than seven loose wires.
- Error Reduction: Color-coded wires within the ribbon often help maintain consistency, making it easier to trace connections and prevent accidental swaps.
- Speed and Efficiency: Plugging in a single 7-pin connector is much faster than connecting seven separate ones, especially when frequently reconfiguring circuits.
- Reliability: The bundled nature provides some strain relief, potentially making connections more robust in temporary setups.
What Are the Common Uses for These Specific jumper Cables?
7 pin jumper cables are incredibly versatile, primarily used in prototyping with microcontrollers, connecting sensors and displays, and facilitating serial communication. Their common uses span a wide range of electronics projects:
For more insights into optimizing your breadboard layouts, check out our article on Mastering Breadboard Layouts for Beginners.
How Do I Select the Right 7 Pin jumper Cables for My Project?
When choosing 7 pin jumper cables, focus on three key factors: the connector gender (male-to-male, male-to-female, female-to-female), the cable length, and the wire gauge/quality. Making the right choice ensures compatibility and reliability for your specific application.
Connector Gender: Match Your Pins
- Male-to-Male (M-M): Ideal for connecting two female header pins, such as connecting pins on a breadboard to the female headers of an Arduino.
- Male-to-Female (M-F): Perfect for connecting a male header pin (like those on a sensor module) to a female header pin (like those on a breadboard or microcontroller).
- Female-to-Female (F-F): Used to connect two male header pins, for example, linking the male pins of a Raspberry Pi GPIO header to another male pin component.
You might also find mixed gender sets, which are very handy to have in your toolkit. I personally recommend having a variety of all three types on hand.
Cable Length: Avoid Unnecessary Slack
jumper cables come in various lengths, typically from 10cm to 30cm or more. Choose a length that allows your components to be comfortably connected without excessive slack, which can lead to a messy setup and potential signal interference. For breadboard work, 10cm or 20cm are often ideal.
Wire Gauge and Quality: Durability Matters
Most common jumper cables use 22 AWG (American Wire Gauge) wire, which is suitable for most low-current prototyping. For applications requiring slightly more current or more robust physical handling, look for higher-quality cables with thicker insulation (like silicone insulation, which is very flexible and durable) and solid crimps on the connectors. Brands like Adafruit or SparkFun offer reliable options.
What Practical Tips Can Help Me Use My 7 Pin jumper Cables Effectively?
To maximize the utility and lifespan of your 7 pin jumper cables, always practice good organization, gentle handling, and strategic color-coding.
- Color-Coding is Your Friend: While the ribbon itself is color-coded, you can further enhance this by consistently assigning specific colors to common signals. For example, always use red for +5V, black for GND, blue for SDA, yellow for SCL, etc. This makes troubleshooting a breeze.
- Gentle Insertion and Removal: Always pull or push the connector housing, not the wire itself. Yanking on the wire can damage the crimp connection, leading to intermittent faults.
- Organize and Store Properly: Keep your bundles tidy. Use cable ties or small pouches to prevent them from becoming a tangled mess in your parts bin. A good habit is to re-bundle them after each use.
- Test Before You Trust: If a connection isn&t working, don&t immediately assume your code or component is faulty. Use a multimeter to quickly check continuity through your jumper cable, especially if it&s been heavily used or stored poorly.
- Avoid Over-Stressing: While flexible, don&t bend the cables at extreme angles right at the connector. This can put undue stress on the wire-to-pin connection.
Where Can I Purchase Reliable 7 Pin jumper Cables?
Reliable 7 pin jumper cables can be purchased from specialist electronics retailers, large online marketplaces, and sometimes local hobby shops.
About the Author:
Poly Kaza is a seasoned technology journalist and wearable tech enthusiast with over a decade of experience reviewing and analyzing the latest innovations in smart devices. He has a deep understanding of the underlying technologies that power smartwatches and a passion for helping consumers make informed decisions about their digital companions. His work focuses on bridging the gap between complex technical specifications and practical user experience, with a keen eye on how wearables impact daily life and health.




2 comments